The EMX WEL-200 was meticulously crafted with the needs of installers at the forefront.
Our aim?
To create a product that not only simplifies the installation process but also stands the test of time, offering prolonged durability and peak performance.
Yet, like any finely tuned instrument, the WEL-200 truly shines when certain best practices are adhered to during installation.
Below, we’ve highlighted these key guidelines to ensure you get the most out of your WEL-200, below the guidelines section, you can view a few videos that further explain the WEL-200 setup process.
Long-lasting installs are just a few steps away.
Enjoy.
ATTENTION: Failure to mount the RX properly may result in poor battery life in TX units.
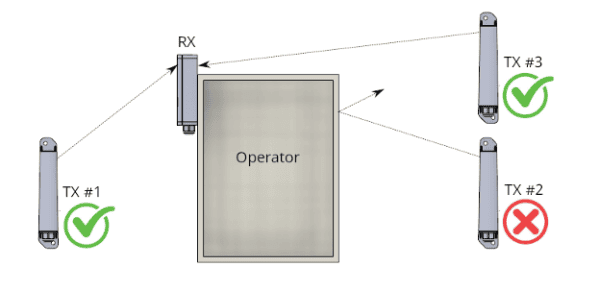
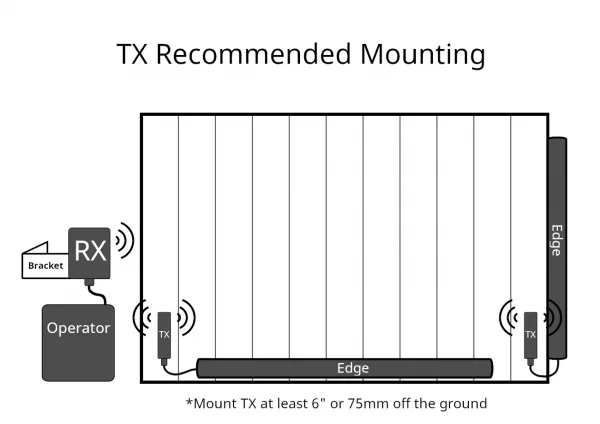
Line of sight
When mounting a WEL-200 system, Line of Sight must exist between the RX and each TX to ensure a good wireless connection. Line of Sight is illustrated below:
In the diagram, TX #1 and TX #3 have LINE OF SIGHT to the RX. TX #2 does not have LINE OF SIGHT to the RX because the operator will block the wireless signal. TX #2 may suffer from a poor connection and poor battery life.
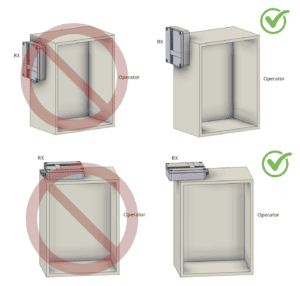
Mounting the RX
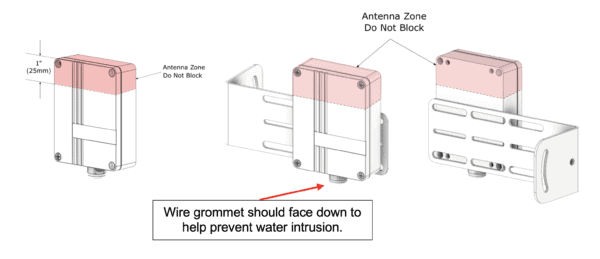
Mount the RX to the exterior of the operator housing using #8 machine screws (the mounting holes can be accessed by removing the front cover). The RX must overhang the operator housing by about 1” (25mm) so that the antenna is not blocked. The antenna zone is illustrated below.
BEST PRACTICE: Install the RX using an L-bracket. Take care to NOT block the antenna zone.
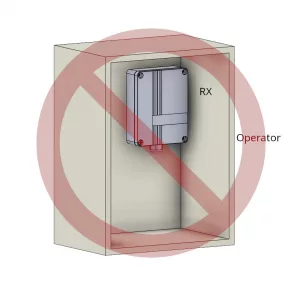
Never install the RX inside an operator box, especially a metal one
Examples of good and bad installations are shown below
Even though there are 4 mounting holes on the RX, it’s OK to just use 2 holes so that the RX will overhang the operator box as shown above. When mounting the RX, make sure the cable grip is facing down or to the side, never up – this will prevent water from getting in.
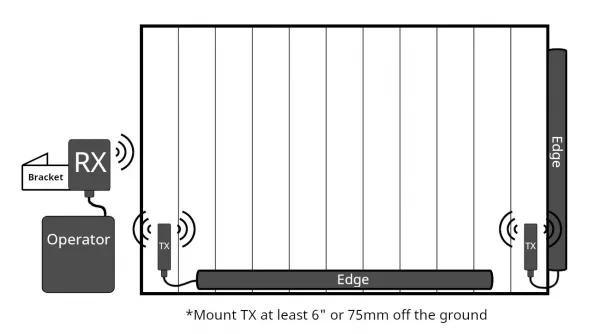
Mounting the TX
Mount each TX near its sensing edge: First, wire the sensing edge into the TX’s terminal blocks. There is no polarity on this wiring. Next, use two #8 machine screws to secure the TX to the gate. Recommended locations are shown below for the front and side of a gate:
BEST PRACTICE: When mounting TX and RX unit, mount with wire grommet facing down to prevent water intrusion.